Simison's Stacks RADseq tutorial for processing Illumina dd-Rad single-end and paired-end multiplexed data
RETURN to CCG Ubuntu Directory
Table of Contents
Stacks Protocol for single and paired-end contigs.
- Nov. 23, 2012 - Identify Illumina Indices
- April 17, 2013 - Extract fastq files from raw Illumina .gz data
- Feb. 3, 2015 - Using Stacks "process_radtags" script to demultiplex (UPDATED - v1.24 has many changes)
- Nov. 24, 2012 - Run FastQC to evaluate forward read quality
- Nov. 24, 2012 - Run FastQC to evaluate reverse read quality
- Nov. 24, 2012 - Trim indices and adapter sequences from reverse reads
- Feb. 3, 2015 - Run Stacks denovo_map.pl pipeline. UPDATED v1.24
- Nov. 25, 2012 - Run Stacks export.pl - identify stacks with SNPs for paired-end matching
- Nov. 25, 2012 - Importing contigs into the database
- Feb. 3, 2015 - Run Stacks 'populations' script to calculate Fst statistics. UPDATED v1.24
Nov. 23, 2012 - Identify your Illumina Indices
    For e.g., my last libraries were tagged with indices 7-12:
    index #7 = CAGATC
    index #8 = ACTTGA
    index #9 = GATCAG
    index #10 = TAGCTT
    index #11 = GGCTAC
    index #12 = CTTGTA
April 17, 2013 - Extract fastq files from raw .gz data
    NOTE: This is no longer necessary with versions > 0.99997 of "process_radtags"; it can process .gz files using the '-i gzfastq' option.
          If you want to extract .gz files do:

    $ gunzip file.gz
February 3, 2015 - Using Stacks "process_radtags" script to demultiplex and check enzyme overhang (version 1.24)
The current version (1.24) of "process_radtags" has several new features:
- A filename can now be specified in the barcodes file
- Output files can be gzipped if inputs are gzipped or if requested with '-y' option
Previous updates for process_radtags v. 1.04
- Double digest data can now be processed
- Combinatorial barcodes can now be processed
- There is a new barcode format for combinatorial barcodes
- The naming scheme has changed from *.fq_1 and *.fq_2 to *.1.fq and *.2.fq
- Double digest enzymes can be specified with the '--renz_1' and '--renz_2' options
- The default quality encoding scheme is now Phred+33 (standard for Illumina data)
$ process_radtags -P -p ./raw -b ./docs/ddBarcodes.txt -o ./samples -c -q -r --inline_index
--renz_1 sphI --renz_2 mluCI -i gzfastq
You may chose not to use the -c option (remove any read with an uncalled base) because of low coverage.
- The barcode file for combinatorial barcodes is a simple text file with two columns separated by tabs;
the first column is the barcode, the second column is the Illumina index. For example:
GCATG CAGATC
AACCA CAGATC
CGATC CAGATC
TCGAT CAGATC
TGCAT CAGATC
CAACC CAGATC
GCATG ACTTGA
AACCA ACTTGA
CGATC ACTTGA
TCGAT ACTTGA
TGCAT ACTTGA
CAACC ACTTGA
The NEW process_radtags 1.24 barcode file for combinatorial barcodes plus a specified filename is a simple text file with three columns separated by tabs
(NOTE: populations will add extension to specified filename);
GCATG CAGATC sample1
AACCA CAGATC sample2
CGATC CAGATC sample3
TCGAT CAGATC sample4
TGCAT CAGATC sample5
CAACC CAGATC sample6
GCATG ACTTGA sample7
AACCA ACTTGA sample8
CGATC ACTTGA sample9
TCGAT ACTTGA sample10
TGCAT ACTTGA sample11
CAACC ACTTGA sample12
Often the sequencing facility, Like UC Berkeley's qb3 facility, will demultiplex by Illumina indices for you. In this case, you will need to create a new
directory for each set of fastq files and use a two column barcode file, the fist column for barcodes and the second for your new filename.
GCATG sample1
AACCA sample2
CGATC sample3
TCGAT sample4
TGCAT sample5
CAACC sample6
GCATG sample7
AACCA sample8
CGATC sample9
TCGAT sample10
TGCAT sample11
CAACC sample12
I recommend the following steps for Illumina data that has been index demultiplexed (barcodes still intact):
- Create new directories, one for each demultiplexed index.
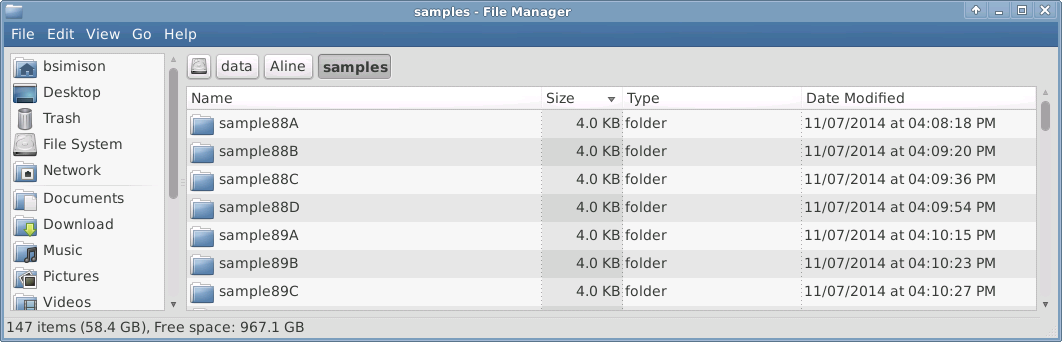
- Move all of the corresponding Illumina .gz files into these new directories (all of these Illumina .gz files had the same Illumina index "ATCACG").
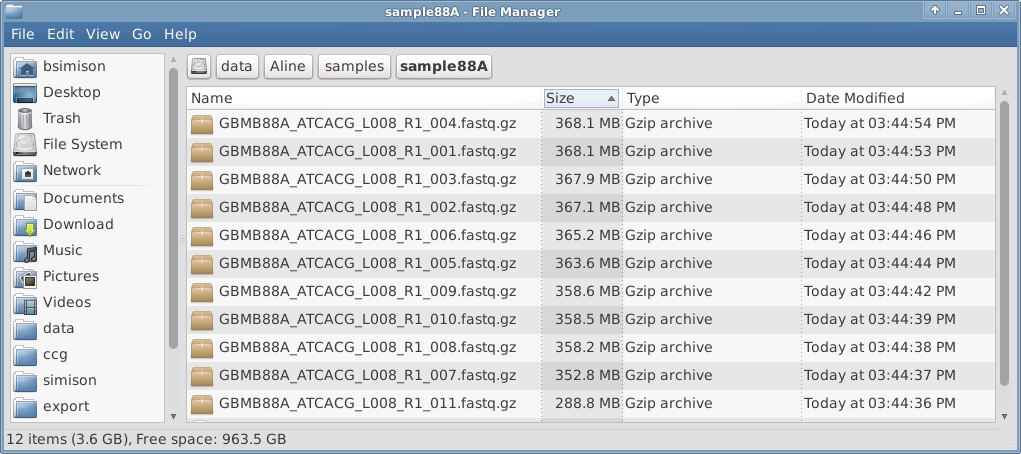
- Run process_radtags seperately for each set of .gz files in your new directories. This will extract the individual files for each sample.
- After you have run process_radtags for each directory, you should have unique filenames for all of your RAD files. You can now move all of these files
into a single "samples" directory.
- If your enzyme is not yet supported by Stacks use the --disable_rad_check option or let me know which enzyme you would like to add
and I will edit the renz.h file and recompile Stacks.
Note: The overhang sequence for sphI in the Stacks renz.h file is different than ours (ours=CATGC, renz.h=GCATG)
(See image 1). I have updated the renz.h file for v1.04 and it works.
Nov. 24, 2012 - FastQC of forward reads
Run FastQC to check read quality and characteristics of forward *.1.fq files.
Image 1 - FastQC of Forward reads:
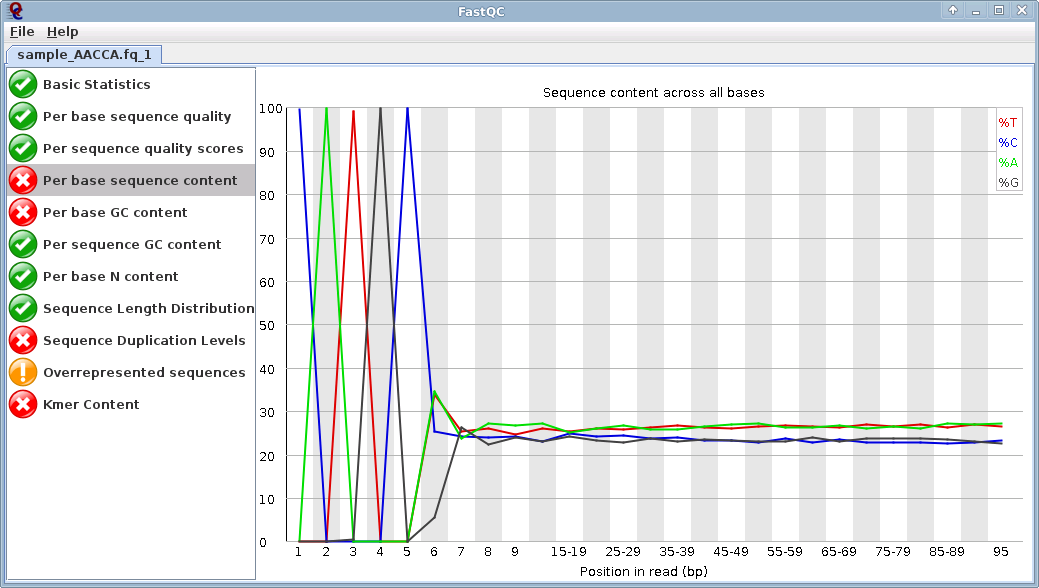 Note the "CATGC" bias at the beginning of the read - This is the SphI recognition site, all good reads will have this at the beginning.
Do not cut off. "process_radtags" will cut off the barcodes unless you tell it not to.
Note the "CATGC" bias at the beginning of the read - This is the SphI recognition site, all good reads will have this at the beginning.
Do not cut off. "process_radtags" will cut off the barcodes unless you tell it not to.
Nov. 24, 2012 - FastQC of reverse reads
Run FastQC to check read quality and characteristics or reverse *.2.fq files.
Image 2 - FastQC of Reverse reads:
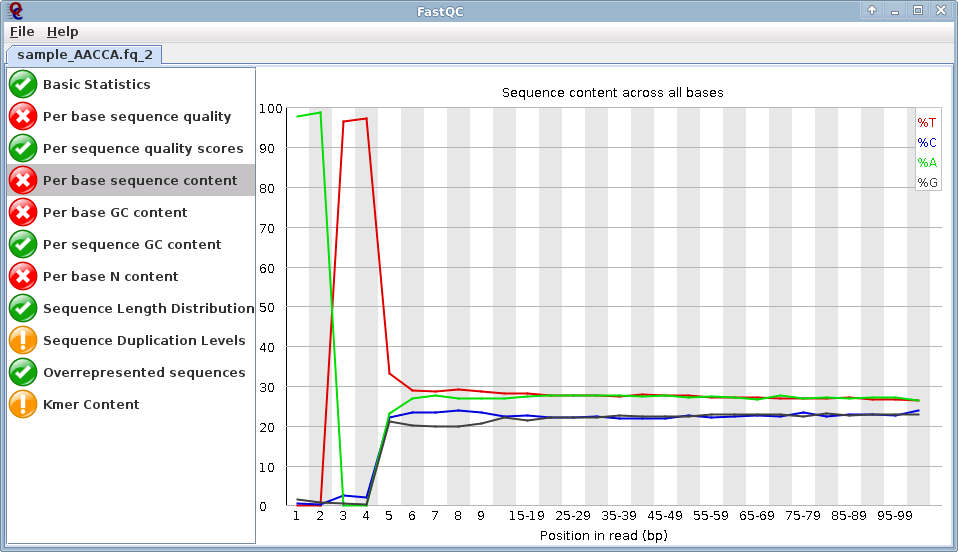 Note the "AATT" biases at the beginning of the read: All reverse reads will have this at the beginning. This is the mluCI Restriction endonuclease overhang sequence.
This bias can to be trimmed if you like, but is part of the target fragment and can be left alone.
Note the "AATT" biases at the beginning of the read: All reverse reads will have this at the beginning. This is the mluCI Restriction endonuclease overhang sequence.
This bias can to be trimmed if you like, but is part of the target fragment and can be left alone.
Nov. 24, 2012 - FastX trim of reverse reads
    If you really want to trim the first bases from the reverse reads, use the FastX trimmer script "FASTA/Q Trimmer".$ fastx_trimmer -i sample_ACCAA.2.fq -o sample_ACCAA_trimmed.2.fq -f 6 -Q 33    The output (-o) file names need to be identical to the forward read with the reverse extention *.2.fq.
    To run a fastx_trimmer bash script on multiple samples:$ cd /samples
$ for file1 in `ls *.2.fq*`; do fastx_trimmer -i $file1 -f 6 -Q 33 -o ${file1}_trim.2.fq 2>&1; done    The name of the file will be something like 'sample_TGCAT.2.fq_trim.2.fq'. You will have to rename these.
    The bash script will be improved to create better output names when I get around to it.
    To batch rename files in a directory:$ cd /sample
$ rename 's/\.2.fq_trim.2.fq/_trim.2.fq/' *.2.fq
Feb. 3, 2015 - Running Stacks Pipeline:
Note: If your denovo_map.pl run is terminated or fails during the run, your database tables will have data and cannot be overwrittem. You must clear all of the database tables before running again or create a new database. Also, If yo have any samples that have no data or very little data, denovo_map.pl will fail.
1. Create a unique directory for each analysis. For example, /data/kapan/analyses/radtag/stacks_Nov2012
2. in that unique directory create 4 new directories "assembled" "pairs" "samples" "stacks"
3. put all of your *.1.fq and *.2.fq files into the "samples" directory.
4. Create a unique MySQL database (please name all rad tag databases with the following format: "uniquename_radtags") $ mysql -e "CREATE DATABASE Trachexample_radtags"
5. Add database table definition from Stacks example file "stacks.sql"$ mysql Trachexample_radtags < /usr/local/share/stacks/sql/stacks.sql
6. Confirm that the database and tables were properly created $ mysql
mysql> use Trachexample_radtags;
mysql> show tables;
You should see the following list of tables:
+---------------------------+
|Tables_in_Trachexample_radtags|
+---------------------------+
| alleles |
| batches |
| catalog_alleles |
| catalog_annotations |
| catalog_genotypes |
| catalog_snps |
| catalog_tags |
| chr_index |
| fst |
| genotype_corrections |
| markers |
| matches |
| pileup |
| populations |
| ref_radome |
| samples |
| sequence |
| sequence_blast |
| snps |
| sumstats |
| unique_tags |
+---------------------------+
21 rows in set (0.00 sec)
7. UPDATED - For population data, run the "denovo_map.pl" script using the -s option (denovo_map.pl options). Note that you only run the *.1.fq
files at this stage. $ nice -n 19 denovo_map.pl -m 3 -M 3 -T 16 -B Trachexample_radtags -b 1 -t -a 2012-24-11 -D "Trach caribb
plus USA pops paired-end ddRad" -o ./stacks -s ./samples/MVZ233245.1.fq -s ./samples/UNK593.1.fq ...
Note that the -T option allocates cores to some of the scripts. The CCG Ubuntu server has a total of 32. Please do not use more than 16 at a time.
If you are analyzing single-end data, skip to Running the Stacks 'populations' script. If you are processing paired-end data, continue with the next steps:
Nov. 25, 2012 - Collating and assembling paired-end reads
    Run Stacks export.pl - identify stacks with SNPs for future step of paired-end matching.$ export_sql.pl -D Trachexample_radtags -b 1 -a haplo -f haplotypes.tsv -o tsv -F snps_l=1
    This pulls the data from the database created by the denovo_map.pl script and creates a large file.

    Now you just want to trim that large file to include just a list of the catalog IDs for the stacks you want a paired-end assembly.$ cut -f 1 haplotypes.tsv > whitelist.tsv
    This will create a file called "whitelist.tsv" which will be read by scripts that will assemble the paired-end reads to the forward reads with SNPs.

    This next step will bin the reverse reads in the database to prepare for the Velvet assembly in the next step.$ sort_read_pairs.pl -p ./stacks/ -s ./samples/ -o ./pairs/ -r 10 -w whitelist.tsv
    the -r 10 parameter tells the script to only keep stacks of 10 reads or more. Depending on your coverage you may want to adjust this.

    Now run Velvet to assemble the reverse reads to your forward stacks.$ exec_velvet.pl -s ./pairs/ -o ./assembled/ -c -e /opt/velvet_1.2.07 -M 200
    -e indicates our velvet directory and -M tells Velvet to only keep assemblies greater than 200 bp.
Nov. 25, 2012 - Importing contigs into the database
    This step will import the paired-end stacks into the database for future analyses.$ load_sequences.pl -b 1 -D Trachexample_radtags -f ./assembled/collated.fa -t pe_radtag
    Note that the '-t pe_radtag' refers to the kind of database and should not be changed. Your database is identified with the -D option.

    we need to re-index the database so that it picks up the newly added contigs.$ index_radtags.pl -D Trachexample_radtags -c
-
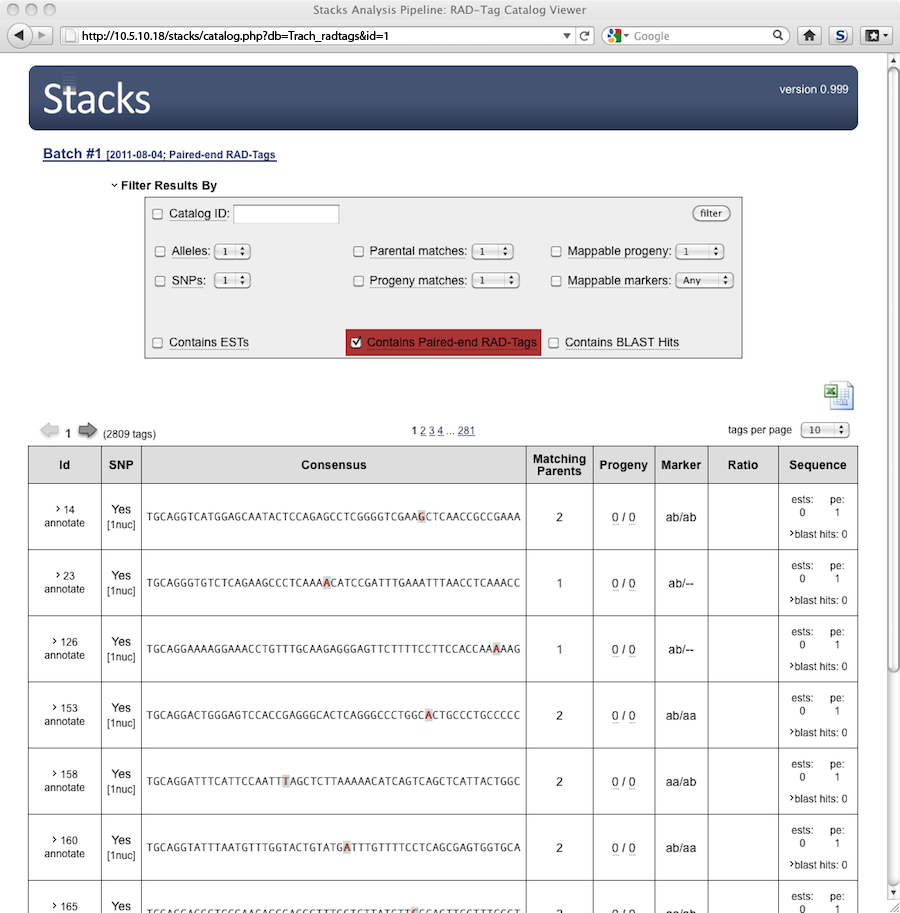
We can now view data in the web interface: The image below is interactive so click around.
close
![]()
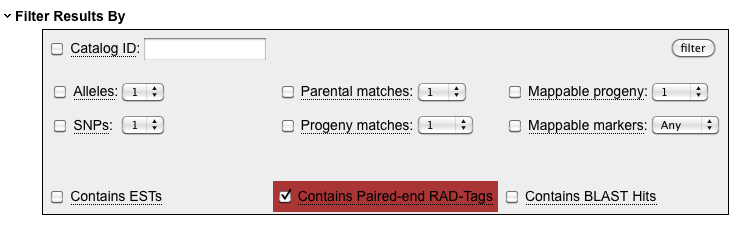
The database detects that you have uploaded either sequence data or BLAST hits and makes available a new
set of filters. The "Contains Paired-end RAD-Tags" filter will only show those loci for which a paired-end
contig could be assembled.
The number of sequences stored is displayed in the newly added column. By clicking on "blast hits" a list
of sequences can be viewed. If BLAST hits were also loaded, they would be displayed in the same
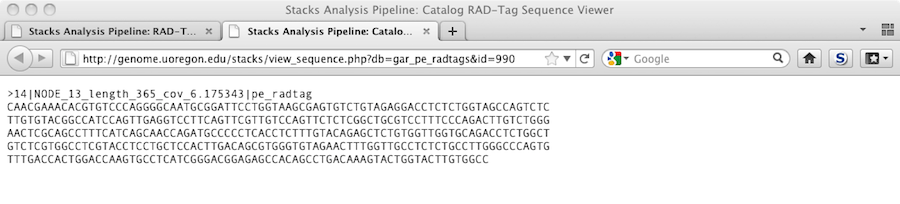
window, corresponding to the sequence used as a BLAST query. Clicking on the name of a sequence will
display the actual sequence in a new window.
Clicking on one of the contig IDs will show us the actual sequence in a new window.
Feb. 3, 2015 - Running the Stacks 'populations' script
    Please review the Stacks v1.24 documentation for the 'populations' script before getting started.
    'populations' calculates population genetics statistics, expected/observed heterzygosity, π, and FIS at each nucleotide position
    and it will compare all populations pairwise to compute FST.
    The script reads the data generated by the denovo_map.pl analysis that was written to the ./stacks directory for that analysis.
    cd into the Stacks analysis directory that you want to run the 'populations' script on. For e.g.$ cd /data/simison/Analayses/Harvard_112412    Create a simple populations text file with your sample names (minus the .fq_1 extension) followed by a tab and a number to indicate
    populations. For example:

ang_JFP642	1
ang_JFP643      1
ang_TP30124    	1
ang_TP30126    	1
dec_JFP596a    	2
dec_JFP598      2
dec_JFP599      2
dec_JFP600      2
decu_JFP577    	3
decu_JFP578    	3
decu_JFP579    	3
decu_JFP580    	3
decu_JFP581    	3
decu_JFP582    	3

    Now run the 'populations' script:$ populations -P ./stacks/ -M ./samples/popmap.txt -b 1 -p 3 -r 0.75 -m 8 --structure    -P indicates location of denovo_map.pl output.
    -M indicates the location of your populations file.
    -b is the "batch ID" given in your denovo_map.pl analysis, usually = 1.
    -p filters the minimum number of populations a locus must be present in to process a locus.
    -r filters the minimum percentage of individuals in a population required to process a locus for that population.
    -m indicates the minimum number of populations a locus must be present in to process a locus.
    --structure option tells 'populations' to output the data in a format readable by Structure.
    There are other options available - check the Stacks v1.04 documentation.
    The output data will be written to the ./stack directory as 'batch_1.structure.tsv'.

    The beginning of the file will look like this:# Stacks v1.04;  Structure v2.3; November 03, 2012
                        2	5	7	13	14	15	17	18	19	25
HFL2_AGCTA	1	4	3	2	1	3	2	4	3	3	3    But, Structure 2.3.4 July 2012 cannot read this file properly. Edit the file by deleting the entire first row.
    Make sure there are no blank rows at the top of the file.

    The beginning of the file should now resemble this:                        2	5	7	13	14	15	17	18	19	25
HFL2_AGCTA	1	4	3	2	1	3	2	4	3	3	3    NOTE: The first column contains sample names. If you designate populations, the second column contains population ID.
    Also, Structure has a 11 character taxon name limit. Structure will truncate names to 11.
    If your taxon names are longer than 11, run a search and replace on your 'populations' batch_1.structure.tsv output file
    and make sure none of the new names are identical.
    To run Structure and Distruct, I recommend the step-by-step instructions on the Bodega phylo Structure wiki website.